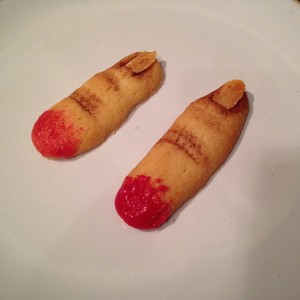
If you’re looking for a recipe for gruesome Halloween biscuits, these severed fingers may well be right up your street…
Ingredients
For the biscuits:
– 225g of caster sugar
– 150g of butter, softened
– 2 tsp of baking powder
– A pinch of salt
– 2 eggs
– 350g of plain flour
– Flaked almonds
For the decoration:
– A small paintbrush
– Cocoa powder or ground cinnamon
– Red food colouring
– Icing sugar
– Butter, softened
Method
1. Preheat your oven to 190 degrees C.
2. For the biscuits, place the caster sugar and butter in a mixing bowl and cream together until smooth. Add in the eggs, baking powder and salt, and combine well.
3. Sift in the sugar, a little at a time, mixing in well. You may need slightly more or less sugar than I used to get the right consistency: you want the dough to be easy to roll in your hands, and not sticky.
4. Grease a couple of baking trays, and sprinkle lightly with flour.
It’s now time to sculpt the fingers. They will expand in the oven, so make them about half the size you want them to end up. If you’re not sure you’ve got the sizing right, bake a few test biscuits before doing the whole batch.
5. Take a ball of dough around half an inch in diameter, and roll it in your hands to make a sausage-like shape.
6. Place on a floured work surface, and shape into fingers. Use the shape of your own fingers as a guide, but make them about half the width you want them to be. Ensure that the “severed” end is squared off.
7. Use the edge of a teaspoon to mark out the knuckles of each finger, and then use the base of the teaspoon bowl to flatten out the end to make a bed for the fingernail.
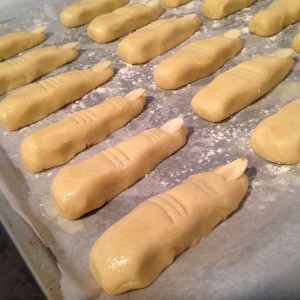
8. Move the biscuits to your greased and floured baking trays. Take a flaked almond and press it into the nail bed you’ve created, folding some of the mixture around the base of the “nail” so that it stays in place. If you need any final tweaks to the shape of the fingers, do these now. The uncooked biscuits should look something like this… (note – yours should be thinner – this batch came out far too big!)
9. Bake in your pre-heated oven for 10-12 minutes, and leave to cool.
10. While cooling, mix together some red food colouring with a small amount of icing sugar and softened butter until you have a red paste (this will be the blood).
11. Once cool, take a small paintbrush and dip into your cocoa powder or ground cinnamon. Paint this into the wrinkles and around the nail to enhance the gruesomeness.
12. Take your red food colouring mixture, and dab around the severed end of each finger to add a blood effect. Et voila! Severed finger Halloween biscuits…


[…] How do you use your pumpkin flesh and seeds at Halloween? Let me know in the comments! Or if you’re looking for spooky Halloween recipes, take a look at my Halloween severed finger biscuits! […]